# Mastering Terraform with AWS Guide Part 1: Launch Real AWS Infrastructure with VPC, IAM and EC2
Table of Contents
So… you’ve heard about Terraform. Maybe your team is using it, maybe your cloud dreams demand it — or maybe, like me, you’ve been deep in the Kubernetes jungle (My blog posts about K8S) and now want a declarative friend for AWS too! Either way, welcome aboard. In this post, I’ll walk you through setting up your Terraform with AWS environment from scratch, on a Mac.
We’ll start simple and go all the way to managing VPC, Security Groups, IAM users and EC2 infrastructure using best practices -all built using Terraform with AWS. By the end, you’ll not only run Terraform with AWS — you’ll understand all below questions, just to name a few, such as how to run terraform with aws, how to create aws ec2 instance using terraform, how to create security group in aws using terraform…fantastic!
What is Terraform?
Terraform is an open-source infrastructure as code (IaC) tool created by HashiCorp. It lets you define, provision, and manage cloud infrastructure using human-readable config files written in HCL (HashiCorp Configuration Language).
Think of it as Git for your cloud — but with superpowers.
I know it’s kind of short introduction, let’s look at a real life scenario to understand what it is and why we need it!
Why Do We Actually Need Terraform? A Real-Life Scenario
Let’s say you’re an ambitious DevOps engineer named Alice. One day your boss comes in hot:
“Hey Alice! We need 3 EC2 instances on AWS, 2 on Azure, and an S3 bucket for backups. Oh — and don’t forget a VPC, IAM roles, a database, some tags, and make it all repeatable. By lunch.”
No pressure, right?
Without Terraform with AWS, you’d be:
-
Clicking through three different cloud consoles 🖱️
-
Copy-pasting IPs into random docs 📋
-
Forgetting what you named stuff by the third resource 😵💫
-
Swearing at yourself during the teardown: “Wait, which region was that bucket in?”
Now imagine doing this again next week — for dev, staging, and prod. Nightmare fuel.
Enter Terraform: Your Cloud Wizard
Now, we have Terraform with AWS:
-
You write the infrastructure once in
.tffiles -
Want 10 EC2s instead of 3? Change
count = 10, re-run -
Need to deploy the same setup on Azure? Change the provider
-
Broke something?
terraform destroyto the rescue
It’s like having a universal remote control for cloud resources.
You got this! Terraform with AWS makes managing AWS cloud infrastructure not only repeatable, but also version-controlled — just like your code.
In Short
Terraform keeps your cloud clean, consistent, and version-controlled — no more “what did I click last Tuesday?” mysteries. It helps you:
-
Reuse configs like code
-
Version control your infrastructure
-
Avoid human errors from clicking the wrong dropdown
-
Automate across multiple environments (dev, staging, prod)
-
Sleep better knowing you can recreate your stack in seconds
So next time someone says “spin up a new environment”, you won’t sweat it — you’ll terraform apply and sip your coffee like a boss. ☕ And of course, not just Terraform with AWS, you can work with different providers and maintain consistentce between them easily!
Step-by-Step Guide to Learn/Practice Terraform
Install Terraform on macOS
Let’s install Terraform using Homebrew:
brew tap hashicorp/tapbrew install hashicorp/tap/terraformConfirm installation:
terraform version
Setup Terraform Aliases (Optional but Awesome)
If you’re lazy (like all great engineers), add these aliases to your ~/.zshenv:
# Terraformalias f='terraform'alias finit='terraform init'alias fv='terraform validate'alias fp='terraform plan'alias fpo='terraform plan -output 'alias fa='terraform apply'alias faa='terraform apply --auto-approve'alias fcon='terraform console'alias fgra='terraform graph'alias fo='terraform output 'alias fs='terraform show 'alias fsj='terraform show -json 'Then run:
source ~/.zshenvBoom. Productivity unlocked. 🚀
Beginner Script to Explore Terraform Language
Before we jump into Terraform with AWS, we need to make sure we understand how Terraform works without involving AWS.
Let’s create some .tf files to practice variables, data sources, and conditionals.
mkdir -p tutorial/basiccd tutorial/basicSave this as test-vars.tf.
variable "my-test" {  type    = number  default = 123}
variable "my-map" {  type = map(any)  default = {    "key1" = "value1"    "key2" = "value2"  }}
variable "my-list" {  type = list(any)  default = [    "value1",    "value2"  ]}
output "my-test" {  value = {    value1 = var.my-map["key1"]    value2 = var.my-list[0]  }}
variable "environment" {  type    = string  default = "dev"}
output "conditional-test-output" {  value = var.environment == "dev" ? "Development Environment" : "Production Environment"}
data "local_file" "local_file_example" {  filename = "${path.module}/test-vars.tf"}
output "file-content" {  value = data.local_file.local_file_example.content}
Above Terraform script gives us a nice little playground to understand several core features: variables with different data types, outputs, conditional expressions, refer to an element in the array or map, and a data source to read from a local file.
It starts by defining three variables:
-
my-testis a number type with a default of123, -
my-mapis a map with arbitrary values (usingany), -
my-listis a list also holding values of any type.
Data Types
There is alwasy a question in every programming language, same in Terraform HCL:
How to declare variables in terraform?
I pulled a table to illustrate data types as below:
| Data Type | Description | Example |
|---|---|---|
string | A sequence of Unicode characters (text) | variable "env" { type = string default = "dev" } |
number | A numeric value (int or float) | variable "count" { type = number default = 3 } |
bool | Boolean (true or false) | variable "enabled" { type = bool default = true } |
list(type) | Ordered sequence of values of same type | variable "names" { type = list(string) default = ["a", "b"] } |
map(type) | Key-value pair object with same type values | variable "tags" { type = map(string) default = { "env" = "prod" } } |
set(type) | Like a list, but unordered and unique | variable "unique_ids" { type = set(string) default = ["a", "b", "a"] } |
tuple([types]) | Ordered collection of mixed types | variable "example" { type = tuple([string, number]) default = ["x", 10] } |
object({ ... }) | Structured object with named attributes | variable "config" { type = object({ name = string, count = number }) default = { name = "x", count = 1 } } |
any | Wildcard for any type (use sparingly) | variable "dynamic_input" { type = any default = "maybe anything" } |
Output Block
Then we have an output "my-test" block that shows how to extract values from these structures: it pulls key1 from the map and the first element of the list. This block showcases interpolation and indexing. With output, after running terraform apply, this output will display value1 and the first item from my-list.
Conditional Expression
We also introduce a variable "environment" set to "dev", and use a conditional expression in output "conditional-test-output" to return a string based on its value—mimicking basic logic without needing an if block.
Data Resrouce Block
Finally, there’s a data resource: data "local_file", which loads the content of a file named test-vars.tf located in the same module directory, and outputs its content. This is a powerful feature when your Terraform config needs to reference external data—like existing files, templates, or config artifacts.
Terraform Commands
To manage infrastructure effectively with Terraform, there’s a standard lifecycle of commands that help you maintain control and visibility over changes.
-
terraform initinitializes the working directory containing the.tffiles. It downloads the necessary provider plugins (like AWS) and prepares the backend if we’re using one. This step is required before any other command. -
terraform validateperforms a syntax check on your configuration files to ensure everything is well-formed. It catches structural issues early but doesn’t check the actual resource existence or cloud-level constraints. -
terraform plancreates an execution plan showing what actions Terraform will take. You might ask, “How to read terraform plan output”, it’s simle! It compares desired state (as defined in the code) with the current state and highlights what will be created, changed, or destroyed—without actually applying any changes. -
terraform applyexecutes the actions proposed by the plan, provisioning or modifying infrastructure to match your configuration. This is when Terraform interacts with AWS (or other providers) to make things real. -
terraform outputdisplays the values defined in youroutputblocks after a successful apply. It’s commonly used to retrieve resource attributes (like instance IPs or ARNs) needed for further automation or verification.
Run test-vars.tf
Let’s use above test-vars.tf file to practice above commands:
[caption id=“attachment_4994” align=“aligncenter” width=“1366”]

[caption id=“attachment_4998” align=“aligncenter” width=“1288”]

[caption id=“attachment_4997” align=“aligncenter” width=“1682”]

[caption id=“attachment_4995” align=“aligncenter” width=“1118”]

Add AWS Capability into Terraform
One of the best parts about using Terraform with AWS is how easily you can spin up and tear down entire environments with a single command. Let’s get our local environment ready for cloud magic.
Setup AWS Root Account and Create IAM User
First, head over to aws.amazon.com and create a root account if you haven’t already.
Then, inside the AWS Console:
-
Navigate to IAM > Users
-
Create a user named
terraform-admin -
Unchecked “Users must create a new password at next sign-in”, no need for testing purpose
-
Grant it the
AdministratorAccess(AWS Managed Policy) -
Enable programmatic access (you’ll need the access key + secret)
-
Console access is optional, I granted it anyway
This IAM user will act as our Terraform operator.
A few screenshots:


After user creation, then we need to create access id and secret key for Terraform as it needs authentication.
Click the user in IAM, go to “Security Credentials” tab, scroll down to find “Access Key” section, create it as below:


We will use the IAM user and the credentials later when terraform .tf files interacting with AWS.
Create IAM Users in Terraform With AWS
Finally we’re here to explain “how to create iam user in aws using terraform”… No worries.
Honestly, Terraform doesn’t have much cryptic or hard-to-read syntax—it’s pretty clean. But there’re two features I want to highlight: the count and for_each.
You might not need either of them on day one, but once you start managing resources with repeatable nested blocks—like multiple tags, multiple ingress rules, or custom configurations per item—it quickly becomes a favorite.
Here I want to demo the usage of each for our first Terraform with AWS blog series by provisioning multiple AWS IAM users using Terraform with AWS, it’s a practical AWS-focused script to create multiple IAM users actually.
Let’s first focus on Count first.
AWS Authentication Setup in Terraform
Before .tf files to work in Terrafrom with AWS, Terraform needs to get credentials of AWS IAM user so that it can be authenticated successfully. There are different methods to authenticate Terraform. Here I am using environment variables.
export AWS_ACCESS_KEY_ID='your_access_key_id'export AWS_SECRET_ACCESS_KEY='your_secret_access_key'export AWS_DEFAULT_REGION='us-west-1'export AWS_PROFILE="default"export AWS_CONFIG_FILE="$HOME/.aws/config"export AWS_SHARED_CREDENTIALS_FILE="$HOME/.aws/credentials"Let’s create folder:
mkdir -p tutorial/aws-iamcd tutorial/aws-iamCount Usage
This script aws_iam.tf looks like below initially without using count:
terraform {  required_providers {    aws = {      source  = "hashicorp/aws"      version = "~> 5.0"    }  }}
resource "aws_iam_user" "terraform_user_0" {  name = "terraform-user-0"}
resource "aws_iam_user" "terraform_user_1" {  name = "terraform-user-1"}
resource "aws_iam_user" "terraform_user_2" { name = "terraform-user-2"}Emm, how to use count in terraform to simplify above code?
You got this! Here we improve scalability with count:
terraform {  required_providers {    aws = {      source  = "hashicorp/aws"      version = "~> 5.0"    }  }}
variable "user_prefix" {  type    = string  default = "terraform-user"}
variable "user_count" {  type    = number  default = 3}
resource "aws_iam_user" "terraform_user" {  count = var.user_count
  name = "${var.user_prefix}-${count.index}"}
So now, the benefits is obvious - No hard-coded user name and it’s easier to scale!
for_each Usage
Now, how to use for_each in terraform? Let’s focus on for_each.
While both approaches (for_each and count) are valid in this Terraform with AWS code, they serve different purposes depending on the use case.
Here’s how to create multiple IAM users using for_each:
terraform {  required_providers {    aws = {      source  = "hashicorp/aws"      version = "~> 5.0"    }  }}
variable "user_prefix" {  type    = string  default = "terraform-user"}
variable "user_count" {  type    = number  default = 3}
locals {  user_names = [for i in range(var.user_count) : "${var.user_prefix}-${i}"]}
resource "aws_iam_user" "terraform_user" {  for_each = toset(local.user_names)
  name = each.value}
This approach uses a local variable to generate a set of user names and then iterates over each unique name using for_each. Each item in the set becomes a resource instance with its own lifecycle, based on the value of each.value.
Count vs. for_each: When to Use Which
| Aspect | count | for_each |
|---|---|---|
| Input type | Integer | Set, map, or other collection |
| Index reference | count.index | each.key / each.value |
| Resource tracking | Index-based | Value/key-based |
| Reordering impact | Can recreate resources on list changes | More stable; avoids recreation if values remain |
| Best suited for | Identical resources with predictable count | Resources that need to be uniquely identified |
Use count when you need a fixed number of uniform resources and the specific identity of each resource doesn’t matter. Use for_each when you’re dealing with uniquely named resources or working with sets/maps — especially in scenarios where identity and lifecycle tracking are important.
Both approaches are fully supported, and the choice should be guided by the structure of your data and the operational needs of your infrastructure.
Advanced: Create AWS VPC/Network/EC2 With Security Groups
Whether you’re building a simple EC2 instance or managing complex networking, Terraform with AWS keeps everything declarative and under control.
Now, let’s build a practical example that:
-
Create a VPC and subnet in AWS
-
Set up internet access
-
Add a security group that allows SSH and HTTP inbound, and all traffic outbound
-
Create an EC2 instance and attach security group
Directory Structure
tutorial/aws-vpc-ec2-demo/├── main.tf├── network.tf├── internet_gateway.tf├── route_table.tf├── security_group.tf├── ec2.tfGet into the folder:
mkdir -p tutorial/aws-vpc-ec2-democd tutorial/aws-vpc-ec2-demomain.tf
This section is always required when working on Terraform with AWS.
terraform {  required_providers {    aws = {      source  = "hashicorp/aws"      version = "~> 5.0"    }  }}
provider "aws" {  region = "us-west-1"}
The block of code in above is the essential handshake between Terraform and AWS. The terraform block specifies that your configuration requires the AWS provider, sourced from HashiCorp’s registry, and locked to version ~> 5.0, which means any non-breaking updates in the 5.x series are acceptable. This ensures compatibility and stability across Terraform runs.
About the version match, I pulled this table for your quick references:
| Version Constraint | Meaning | Example Allowed Versions |
|---|---|---|
~> 3.5 | Allow patch-level updates within 3.x (>=3.5.0, <4.0.0) | 3.5.0, 3.5.1, 3.6.0 |
~> 3 | Allow any version within major version 3 (>=3.0.0, <4.0.0) | 3.0.0, 3.5.2, 3.99.99 |
>= 3.5, < 3.8 | Allow only versions in a specific minor range | 3.5.0, 3.6.1, 3.7.9 |
= 3.5.2 | Pin to a specific version only | Only 3.5.2 |
> 3.5 | Allow any version greater than 3.5 (but not 3.5) | 3.6.0, 4.0.0 |
<= 3.5 | Allow versions less than or equal to 3.5 | 3.0.0, 3.4.9, 3.5.0 |
The provider "aws" block then sets the context for how Terraform interacts with your AWS environment — in this case, targeting the us-west-1 region. This tells Terraform, “Hey, deploy all the resources in the California region.” By declaring the provider and version this way, we’re building a reproducible, consistent infrastructure-as-code setup that won’t break unexpectedly if a newer major version of the provider is released.
network.tf
resource "aws_vpc" "main" {  cidr_block = "10.0.0.0/16"}
resource "aws_subnet" "main" {  vpc_id                  = aws_vpc.main.id  cidr_block              = "10.0.1.0/24"  map_public_ip_on_launch = true}
In AWS, every resource lives inside a Virtual Private Cloud (VPC). This Terraform with AWS block creates a custom VPC with a /16 CIDR block, which allows for 65,536 private IP addresses — a large range that gives you plenty of room to grow. By the way, AWS automatically creates a default VPC in every region.
The aws_subnet slices a /24 block from the VPC — allowing 256 IPs (minus AWS reservations). The critical flag here is map_public_ip_on_launch = true. Without this, your EC2 instances won’t get a public IP, and you’ll be stuck trying to SSH into a black hole. With this setting enabled, instances launched into this subnet will be publicly addressable.
internet_gateway.tf
resource "aws_internet_gateway" "igw" { vpc_id = aws_vpc.main.id}route_table.tf
resource "aws_route_table" "public" {  vpc_id = aws_vpc.main.id
  route {    cidr_block = "0.0.0.0/0"    gateway_id = aws_internet_gateway.igw.id  }
  tags = {    Name = "PublicRouteTable"  }}
resource "aws_route_table_association" "public_subnet" {  subnet_id      = aws_subnet.main.id  route_table_id = aws_route_table.public.id}
security_group.tf
Security groups in AWS are like bouncers for your EC2 instances — they control what traffic is allowed in or out of your virtual machines. Whether you’re allowing SSH for remote access or HTTP for your website, security groups are your first line of defense.
When working on Terraform with AWS, you can define security rules inline within the aws_security_group resource. HashiCorp recommends using dedicated resources for ingress/egress rules now:
-
aws_vpc_security_group_ingress_rule -
aws_vpc_security_group_egress_rule
Previsouly, Hashicorp provides ingress and egress arguments of the aws_security_group resource for configuring in-line rules. But they struggle with managing multiple CIDR blocks, and tags and descriptions due to the historical lack of unique IDs. So now using aws_vpc_security_group_egress_rule and aws_vpc_security_group_ingress_rule resources is the current best practice.
resource "aws_security_group" "web_sg" {  name        = "web_sg"  description = "Allow HTTP and SSH"  vpc_id      = aws_vpc.main.id}
resource "aws_vpc_security_group_ingress_rule" "http_in" {  security_group_id = aws_security_group.web_sg.id  cidr_ipv4         = "0.0.0.0/0"  from_port         = 80  to_port           = 80  ip_protocol       = "tcp"}
resource "aws_vpc_security_group_ingress_rule" "ssh_in" {  security_group_id = aws_security_group.web_sg.id  cidr_ipv4         = "0.0.0.0/0"  from_port         = 22  to_port           = 22  ip_protocol       = "tcp"}
resource "aws_vpc_security_group_egress_rule" "all_out" {  security_group_id = aws_security_group.web_sg.id  cidr_ipv4         = "0.0.0.0/0"  from_port         = 0  to_port           = 0  ip_protocol       = "-1"}
ec2.tf
data "aws_ami" "amazon_linux_2" {  most_recent = true  owners      = ["amazon"]
  filter {    name   = "name"    values = ["amzn2-ami-hvm-*-x86_64-gp2"]  }}
resource "aws_instance" "web" {  ami                         = data.aws_ami.amazon_linux_2.id  instance_type               = "t2.micro"  subnet_id                   = aws_subnet.main.id  vpc_security_group_ids      = [aws_security_group.web_sg.id]  associate_public_ip_address = true
  tags = {    Name = "terraform"  }
  user_data = <<-EOF              #!/bin/bash              sudo amazon-linux-extras enable nginx1              sudo yum clean metadata              sudo yum install -y nginx              sudo systemctl start nginx              EOF}
Here we’re launching a micro-sized instance using the latest AMI using Terrafrom with AWS, placing it in our subnet, and attaching a security group that allows HTTP traffic.
It’s using the latest Amazon Linux 2 AMI — all without hardcoding image IDs as we have pulled the aws_ami resource and filtered our required AMI images. There might be multiple AMI available, most_recent will ensure it pick up the latest one. Specifying t2.micro is important, because it’s available for free tier of AWS account, I don’t want AWS bill surprise me…
The user_data block runs a bash script to install and start NGINX right after the instance boots — voilà, instant web server! 🎉
Terraform Graph
When working with even a moderately sized Terraform with AWS project—like our aws-vpc-ec2-demo that stitches together VPCs, subnets, security groups, EC2 instances, internet gateways, and more—keeping track of how all the resources relate to each other can get a bit overwhelming. That’s where the magic of terraform graph comes in.
Terraform automatically analyzes all your .tf files and maps out the dependencies between resources, so it knows exactly what needs to be created first, what depends on what, and how to destroy them safely in reverse order. It builds a dependency graph internally—and you can view this visually by piping the output of terraform graph into a tool like Graphviz. It’s an eye-opener for understanding Terraform’s internal logic and a fantastic way to document and debug your setup.
Just perform:
terraform graphYou will get:
❯ terraform graphdigraph G { rankdir = "RL"; node [shape = rect, fontname = "sans-serif"]; "data.aws_ami.amazon_linux_2" [label="data.aws_ami.amazon_linux_2"]; "aws_instance.web" [label="aws_instance.web"]; "aws_internet_gateway.igw" [label="aws_internet_gateway.igw"]; "aws_route_table.public" [label="aws_route_table.public"]; "aws_route_table_association.public_subnet" [label="aws_route_table_association.public_subnet"]; "aws_security_group.web_sg" [label="aws_security_group.web_sg"]; "aws_subnet.main" [label="aws_subnet.main"]; "aws_vpc.main" [label="aws_vpc.main"]; "aws_vpc_security_group_egress_rule.all_out" [label="aws_vpc_security_group_egress_rule.all_out"]; "aws_vpc_security_group_ingress_rule.http_in" [label="aws_vpc_security_group_ingress_rule.http_in"]; "aws_vpc_security_group_ingress_rule.ssh_in" [label="aws_vpc_security_group_ingress_rule.ssh_in"]; "aws_instance.web" -> "data.aws_ami.amazon_linux_2"; "aws_instance.web" -> "aws_security_group.web_sg"; "aws_instance.web" -> "aws_subnet.main"; "aws_internet_gateway.igw" -> "aws_vpc.main"; "aws_route_table.public" -> "aws_internet_gateway.igw"; "aws_route_table_association.public_subnet" -> "aws_route_table.public"; "aws_route_table_association.public_subnet" -> "aws_subnet.main"; "aws_security_group.web_sg" -> "aws_vpc.main"; "aws_subnet.main" -> "aws_vpc.main"; "aws_vpc_security_group_egress_rule.all_out" -> "aws_security_group.web_sg"; "aws_vpc_security_group_ingress_rule.http_in" -> "aws_security_group.web_sg"; "aws_vpc_security_group_ingress_rule.ssh_in" -> "aws_security_group.web_sg";}Let’s paste above into https://dreampuf.github.io/GraphvizOnline/, we can get graph as below:
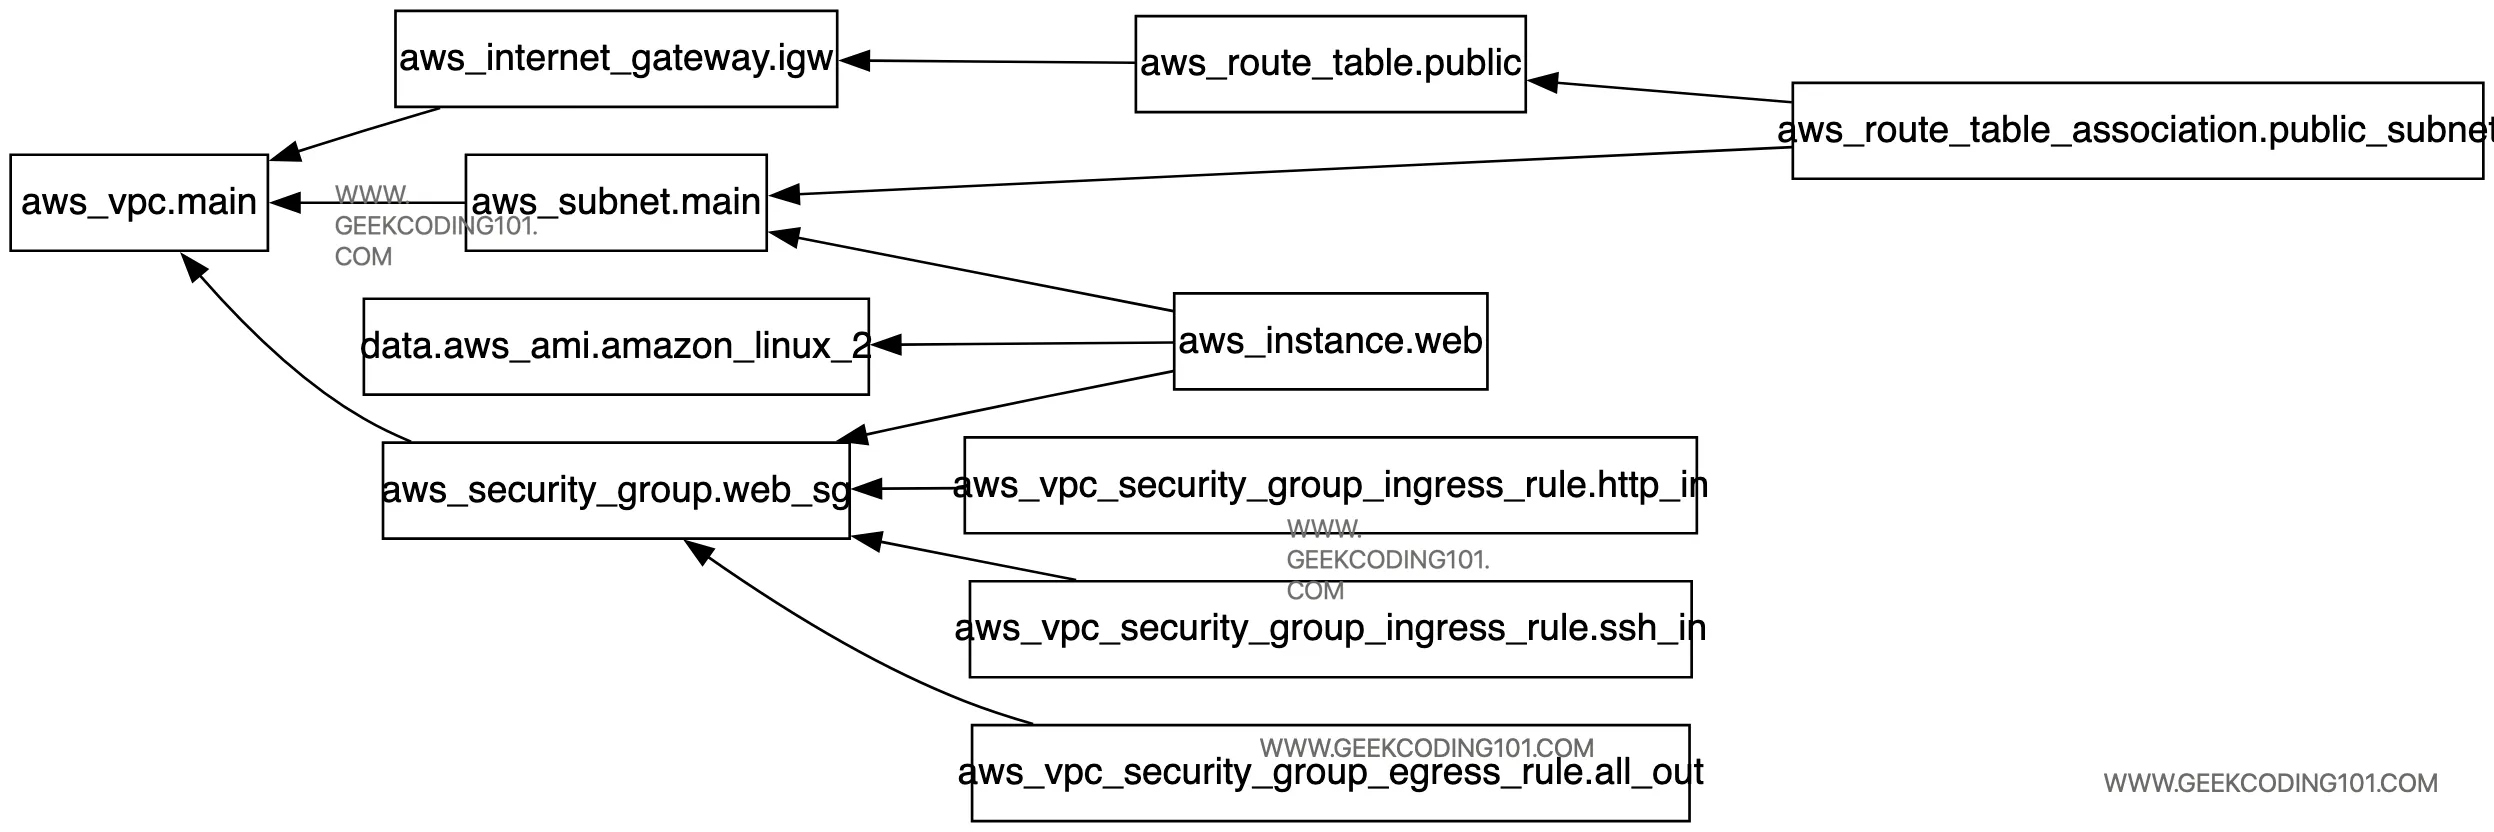
Helpful, right?Once we understand how Terraform with AWS handles dependencies and state, our infrastructure starts to feel like elegant code — not chaos.
Let’s give it a try!

Let’s get the public IP and test Nginx:

Hooray!
Spent nearly a week putting together this first post on “Terraform with AWS” guide — it’s not that complicated, because I wanted every command, every config, and every explanation to click for anyone following along. From VPC, IAM users, Security Groups to EC2 and best practices, I’ve covered the real stuff you’d face when building infrastructure from scratch using Terraform with AWS. 💻☁️
This blog series is all about mastering Terraform with AWS from the ground up — no shortcuts, just clean, scalable infrastructure-as-code.
Up next? We’re going beyond the basics — deploying a fully working EKS (Elastic Kubernetes Service) cluster with Terraform. If you thought this post was useful, wait until you see what’s coming. Buckle up, cloud wranglers. 🚀
Stay tuned for the next post! 😎🔥