# ExternalName and LoadBalancer - Ultimate Kubernetes Tutorial Part 5
Table of Contents
Introduction
Hey, welcome back to my ultimate Kubernetes tutorials! So far, we’ve explored ClusterIP and NodePort, but what if you need to route traffic outside your cluster or expose your app with a real external IP? That’s where ExternalName and LoadBalancer services come in. ExternalName lets your pods seamlessly connect to external services using DNS, while LoadBalancer provides a publicly accessible endpoint for your app. In this post, we’ll break down how they work, when to use them, and how to configure them in your Kubernetes cluster. Let’s dive in! 🚀
Exploring ExternalName Service
Okay, we’re still in my nginx/testpod environment in namespace service-type-test
In our last post, we have ClusterIP running, let’s delete it to get a clean environment to start:
kubectl apply -f /home/admin/nginx-deployment/nginx-clusterip-service.yamlkubectl get service -n service-type-test -o wideYou should not see any service is running in above output.
Now, let’s work on ExternalName!
Creating an ExternalName service is simpler than creating NodePort or ClusterIP , a little bit… create a file /home/admin/nginx-deployment/nginx-externalname-service.yaml:
apiVersion: v1kind: Servicemetadata: name: nginx-service namespace: service-type-testspec: type: ExternalName externalName: my-nginx.external.localUnlike ClusterIP, NodePort, LoadBalancer, or Headless services, this service does not select backend pods. Instead, it just creates a DNS alias that redirects traffic to an external hostname. So:
- No selector needed → It does not route traffic to Kubernetes pods.
- No labels needed → There’s no pod matching required since it’s just a DNS pointer.
- It simply returns the CNAME record when queried inside the cluster.
Simpler on Kubernetes side, but more manual steps on your own side ^^
I must manually configure DNS resolution for my-nginx.external.local so that Kubernetes can resolve it to the correct external IP or hostname.
Then, How?
kubectl edit configmap -n kube-system corednsThen update it as below:
hosts { 172.16.211.12 my-nginx.external.local}
Restart CoreDNS pods and apply ExternalName service:
kubectl rollout restart deployment coredns -n kube-systemkubectl get pods -n kube-system -l k8s-app=kube-dnskubectl apply -f ./nginx-deployment/nginx-externalname-service.yamlkubectl get services -o wideYou should see this:

Tricks on Name Resolution
Now trying to resolve the name in testpod:
[root@testpod /]# nslookup 172.16.211.1212.211.16.172.in-addr.arpa      name = my-nginx.external.local.
[root@testpod /]# nslookup my-nginx.external.local.Server:         10.96.0.10Address:        10.96.0.10#53
Name:   my-nginx.external.localAddress: 172.16.211.12
Did you notice that I put a trailing dot . when running nslookup on my-nginx.external.local ?
It’s a must for current configuration. Otherwise, you will hit this:
[root@testpod /]# nslookup my-nginx.external.localServer:         10.96.0.10Address:        10.96.0.10#53
** server can't find my-nginx.external.local.service-type-test.svc.cluster.local: SERVFAIL
The reason is that the DNS query is being appended with the Kubernetes default search domain, so above command is equal to below:
nslookup my-nginx.external.local.service-type-test.svc.cluster.localThis happens because:
- Inside a Kubernetes pod, DNS queries automatically append the namespace and cluster domain (e.g.,
.svc.cluster.local). - Since
my-nginx.external.localis an absolute FQDN, CoreDNS shouldn’t apply the.svc.cluster.localsuffix.
One option to force a Fully Qualified Domain Name (FQDN) Query is to put a trailing dot . to the DNS name ^^
Then why bother to put the trailing . ? Can we make lifer easier?
Sure. Then just update the configmap of CoreDNS to this:
hosts { 172.16.211.12 my-nginx.external.local my-nginx.external.local.service-type-test.svc.cluster.local}Now both my-nginx.external.local and my-nginx.external.local. work!
Integrate ExternalName And ClusterIP
And then you might ask, why I give 172.16.211.12? Do I have to use the work node IP where is running the pod to resolve the external name?
Not necessarily! You don’t have to use the exact worker node IP where the pod is running. Instead, you should configure my-nginx.external.local to resolve to an IP that can correctly route traffic to the Nginx pod.
One solution I used here which is also recommended is to use ClusterIP!
Before that, we need to delete the exisitng service to get a clean start and ensure no service is running.
kubectl delete -f ./nginx-deployment/nginx-externalname-service.yamlkubectl get services -o wideThen, we need to update our yaml files, because so far both nginx-deployment/nginx-externalname-service.yaml and nginx-deployment/nginx-clusterip-service.yaml are using same name nginx-service! In Kubernetes, a Service is uniquely identified by its name and namespace. Let’s update the name a bit.
I know, it’s just a one line change. But let’s make sure you have it correctly!
nginx-externalname-service.yaml:
apiVersion: v1kind: Servicemetadata: name: nginx-external-service namespace: service-type-testspec: type: ExternalName externalName: my-nginx.external.localnginx-clusterip-service.yaml:
apiVersion: v1kind: Servicemetadata: name: nginx-clusterip-service namespace: service-type-testspec: selector: app: nginx type: ClusterIP ports: - port: 80 targetPort: 80Then perform the commands:
kubectl apply -f nginx-deployment/nginx-clusterip-service.yamlkubectl apply -f nginx-deployment/nginx-externalname-service.yamlThen update CoreDNS via kubectl edit configmap -n kube-system coredns:
hosts { 10.98.205.55 my-nginx.external.local my-nginx.external.local.service-type-test.svc.cluster.local fallthrough}Please note, I added fallthrough this time. Because ClusterIP will be resolved by Kubernetes plugin in CoreDNS instead of hosts plugin. The fallthrough directive allows other DNS plugins (like kubernetes) to continue processing if the entry isn’t found in hosts firstly.
Then run:
kubectl rollout restart deployment coredns -n kube-systemFinally, let’s testing name resolution in testpod:
[root@testpod /]# nslookup 10.98.205.5555.205.98.10.in-addr.arpa       name = my-nginx.external.local.55.205.98.10.in-addr.arpa       name = my-nginx.external.local.service-type-test.svc.cluster.local.
[root@testpod /]# nslookup my-nginx.external.localServer:         10.96.0.10Address:        10.96.0.10#53
Name:   my-nginx.external.local.service-type-test.svc.cluster.localAddress: 10.98.205.55
[root@testpod /]# nslookup my-nginx.external.local.Server:         10.96.0.10Address:        10.96.0.10#53
Name:   my-nginx.external.localAddress: 10.98.205.55
[root@testpod /]# nslookup nginx-clusterip-service.service-type-testServer:         10.96.0.10Address:        10.96.0.10#53
Name:   nginx-clusterip-service.service-type-test.svc.cluster.localAddress: 10.98.205.55
[root@testpod /]#
And then test the access to our Nginx service!
The Comparison of Access Methods
| Source | Can Access nginx-service? | Method to Use | Why? |
|---|---|---|---|
| testpod (inside cluster, same namespace) | ✅ Yes | curl http://nginx-clusterip-service.service-type-test:80 | Resolves to ClusterIP 10.98.205.55, accessible within the cluster. |
| testpod (inside cluster, using ExternalName service) | ✅ Yes | curl http://nginx-external-service.service-type-test:80 | DNS resolves my-nginx.external.local to 10.98.205.55. |
| testpod (inside cluster, using Pod IP directly) | ✅ Yes | curl http://10.244.1.4:80 | Works as Pod IP is routable within the cluster. |
| testpod (inside cluster, different namespace) | ✅ Yes | curl http://nginx-clusterip-service.service-type-test.svc.cluster.local:80 | DNS resolves to ClusterIP, accessible within the cluster. |
Worker nodes (k8s-2, k8s-3, etc.) | ✅ Yes | curl http://10.98.205.55:80 | ClusterIP is accessible from within the cluster. |
Master node (k8s-1) | ✅ Yes | curl http://10.98.205.55:80 | ClusterIP is accessible from within the cluster. |
Laptop (VMFusion, same vmnet2 network as worker nodes) | ❌ No | N/A | Resolve internally within Kubernetes only. |
Laptop using Pod IP directly (curl http://10.244.1.4:80) | ❌ No | N/A | Pod IPs (10.244.x.x) are not reachable from outside the cluster. |
| Laptop (VMFusion) using LoadBalancer (if configured) | ❌ No | N/A | Not provide external access for the current service. |
Amazing!
Exploring LoadBalancer Service
Thanks for being with you so far! I hope you enjoy my step-by-step explaination!
Now let’s clean up the service and start learning LoadBalancer service!
Since we’re running Kubernetes inside VMFusion, there’s no cloud provider to automatically assign a LoadBalancer IP. We’ll need to use MetalLB as a software-based LoadBalancer for our cluster.
Install MetaLB
Go to tags page of MetaLB, get the latest version, currently is 0.14.9. Then we can apply on our master node as admin:
kubectl apply -f https://raw.githubusercontent.com/metallb/metallb/v0.14.9/config/manifests/metallb-native.yamlkubectl get pods -n metalb-systemkubectl get crds | grep metalbkubectl get svc -n metalb-system
Define IPAddressPool
Create file /home/admin/nginx-deployment/metalb-ipaddresspool.yaml:
apiVersion: metallb.io/v1beta1 # Use v1beta1 for latest MetalLB versionskind: IPAddressPoolmetadata: name: default-pool namespace: metallb-systemspec: addresses: - 172.16.211.200-172.16.211.210 # Define an IP range---apiVersion: metallb.io/v1beta1kind: L2Advertisementmetadata: name: l2-adv namespace: metallb-systemkubectl apply -f nginx-deployment/metalb-ipaddresspool.yamlkubectl get ipaddresspools -n metallb-system
Create LoadBalancer Service
Create file /home/admin/nginx-deployment/nginx-loadbalancer-service.yaml:
apiVersion: v1kind: Servicemetadata: name: nginx-loadbalancer namespace: service-type-testspec: selector: app: nginx type: LoadBalancer ports: - port: 80 targetPort: 80Apply and check:
kubectl apply -f nginx-deployment/nginx-loadbalancer-service.yamlkubectl get svc -n service-type-testcurl http://172.16.211.200:80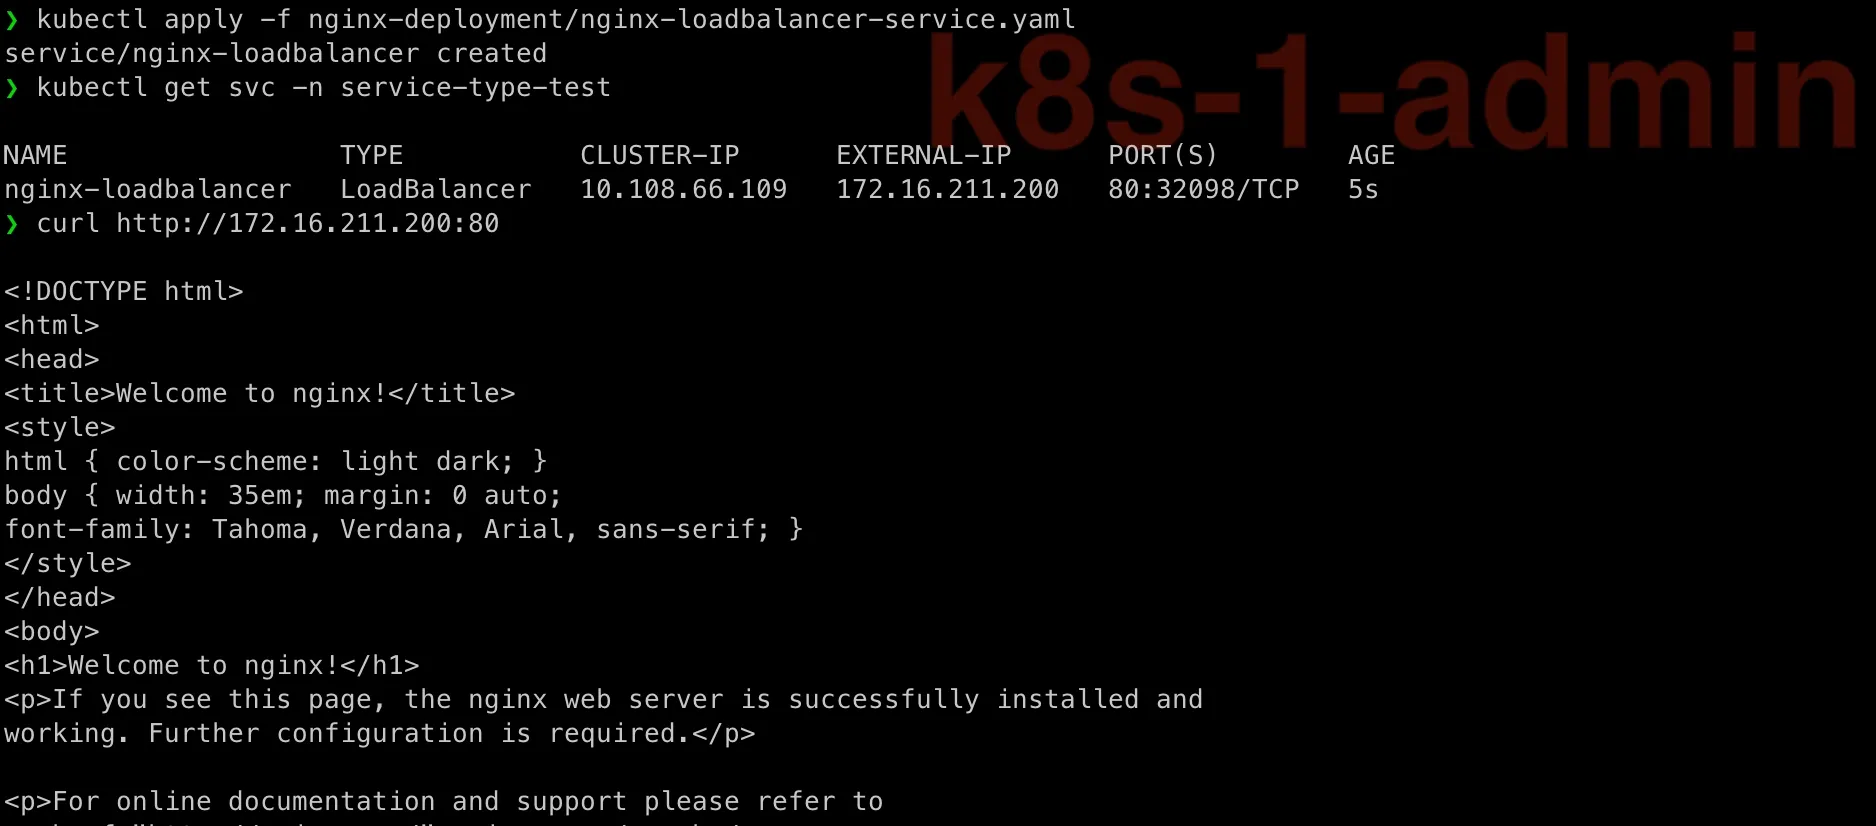
Above is testing on master node k8s-1.
Let’s also test from testpod and from my laptop.
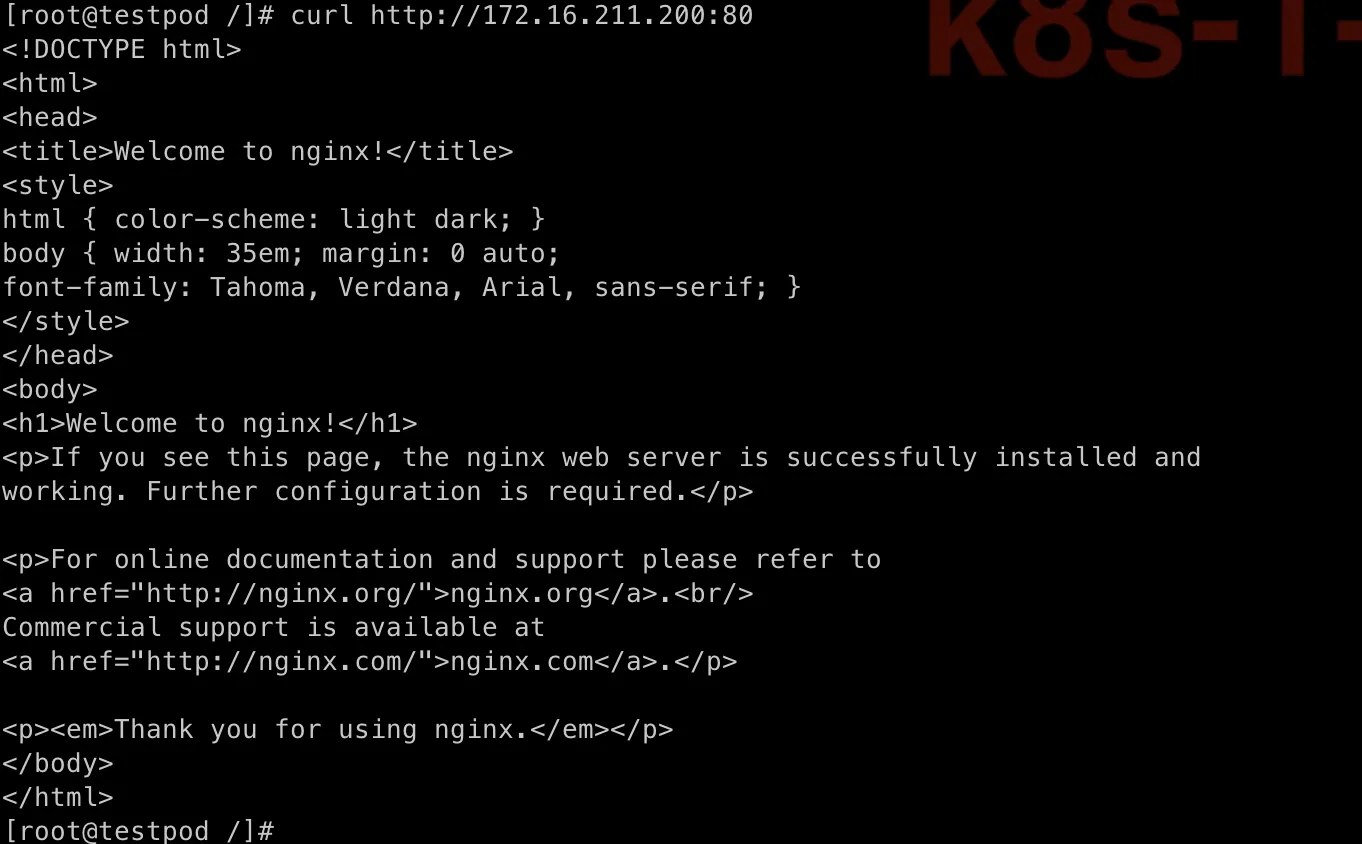
 All work!
Wait! How to Know LoadBalancer Is Balancing ?!
That’s a good question!
Since MetalLB LoadBalancer operates at Layer 2 (default) or BGP, traffic is distributed across multiple pods behind the service. Let’s simulate and test whether MetalLB is balancing traffic.
Check how many pods your LoadBalancer service is distributing traffic to:
❯ kubectl get endpoints -n service-type-test nginx-loadbalancer
NAME                 ENDPOINTS       AGEnginx-loadbalancer   10.244.1.4:80   38m
We can see it has a IP range for balance… What?! It only has one IP! Thinking…

Oh! Remember now! Our Nginx pod was set to run on just one node!
To refresh you memory here is the file we depolied the nginx pod:
❯ cat nginx-deployment/nginx-single-node.yamlapiVersion: apps/v1kind: Deploymentmetadata: name: nginx-single namespace: service-type-test labels: app: nginxspec: replicas: 1 selector: matchLabels: app: nginx template: metadata: labels: app: nginx spec: nodeSelector: kubernetes.io/hostname: k8s-2 containers: - name: nginx image: nginx:latest ports: - containerPort: 80To truly test if MetalLB’s LoadBalancer is distributing traffic, we need multiple pods running behind the service. If only one pod is available, all incoming requests will always hit that single pod, making it impossible to observe any load balancing in action. Kubernetes distributes traffic only among pods that match the service selector, so if there’s just one, there’s nothing to balance! To fix this, we should scale the deployment to at least two or three replicas and then send multiple requests to see how they get distributed. Let’s scale it up and test again! 🚀
Update Nginx Deployment Yaml
Typically we can use kubectl command to update replicas , like this:
kubectl scale deployment nginx-single -n service-type-test --replicas=3However, as you see, our previous Nginx yaml has name nginx-single, it would lead misunderstanding. Let’s just delete it and recreate one with name nginx-multiple-nodes:
❯ kubectl delete -f nginx-deployment/nginx-single-node.yamldeployment.apps "nginx-single" deleted❯ kubectl get pods
NAME      READY   STATUS    RESTARTS   AGEtestpod   1/1     Running   0          2d20h
The new nginx yaml file /home/admin/nginx-deployment/nginx-multiple-nodes.yaml:
apiVersion: apps/v1kind: Deploymentmetadata: name: nginx-multiple-nodes namespace: service-type-test labels: app: nginxspec: replicas: 3 selector: matchLabels: app: nginx template: metadata: labels: app: nginx spec: containers: - name: nginx image: nginx:latest ports: - containerPort: 80kubectl apply -f nginx-deployment/nginx-multiple-nodes.yamlkubectl get pods -o wide
Check kubectl get endpoints again:

Now we can see three IPs assigned!
A Quick Try for Testing?
I can send multiple requests from my laptop to the LoadBalancer IP:
for i in {1..10}; do curl -s http://172.16.211.200 | grep "Welcome"; doneIf load balancing is working correctly, some responses should come from different pods.
Are you kidding? How do I know? This is what I got!
❯ for i in {1..10}; do curl -s http://172.16.211.200 | grep "Welcome"; done
<title>Welcome to nginx!</title><h1>Welcome to nginx!</h1><title>Welcome to nginx!</title><h1>Welcome to nginx!</h1><title>Welcome to nginx!</title><h1>Welcome to nginx!</h1><title>Welcome to nginx!</title><h1>Welcome to nginx!</h1><title>Welcome to nginx!</title><h1>Welcome to nginx!</h1><title>Welcome to nginx!</title><h1>Welcome to nginx!</h1><title>Welcome to nginx!</title><h1>Welcome to nginx!</h1><title>Welcome to nginx!</title><h1>Welcome to nginx!</h1><title>Welcome to nginx!</title><h1>Welcome to nginx!</h1><title>Welcome to nginx!</title><h1>Welcome to nginx!</h1>
I see.
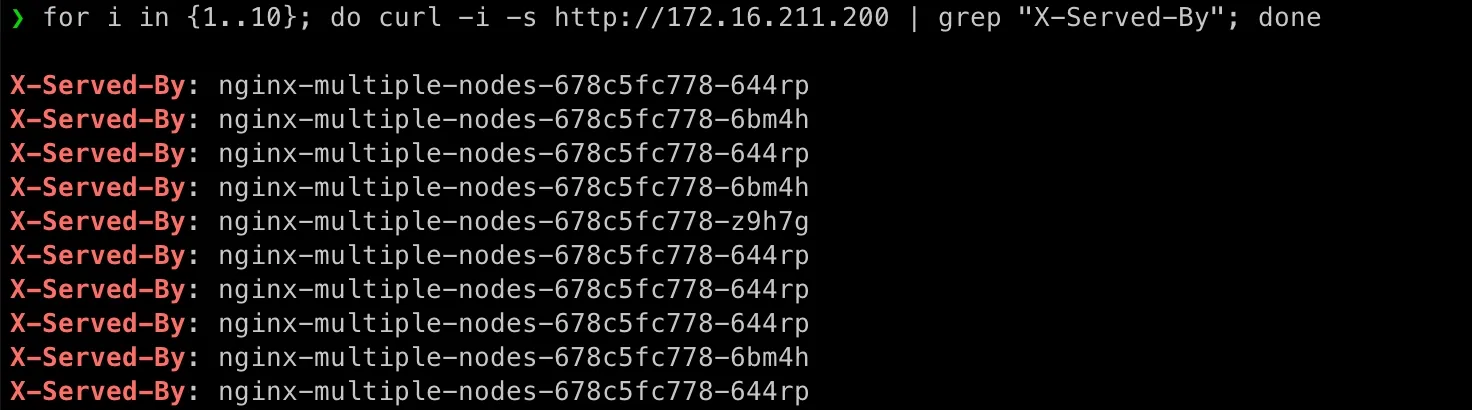
Customize Nginx default.conf via ConfigMap
We can update Nginx default.conf to make it add a header holding the server’s hostname in its response for every request, so we should see different values in response’ header that telling MetaLB is working well.
We don’t need to rebuild Nginx image to have the custom default.conf, we can just use configmap and mount it into our Nginx pod, then we can see response!
You might ask, but what is ConfigMap and why is that? If we want to update Nginx config file, shoudn’t we log into the pod and update the file manually?
Ah ha! Gotcha!
You’re right—on a traditional Linux server, you’d SSH in, modify /etc/nginx/nginx.conf, and restart Nginx. But in Kubernetes, there’s a more scalable and automated way to manage configurations - That is ConfigMap.
What Exactly Is a ConfigMap in Kubernetes?
Alright, think of a ConfigMap as a central place to store our application’s configuration—instead of hardcoding settings inside our container image, we define them separately and let Kubernetes inject them when needed.
Why Does This Matter?
Imagine running the same application in different environments (development, testing, production). We wouldn’t want to rebuild container image every time just to change a database URL, an API key, or a logging level. Instead, we store these settings in a ConfigMap, and our pods pull the configuration dynamically at runtime.
How Does a ConfigMap Work?
A ConfigMap in Kubernetes can store:
✅ Key-value pairs (like environment variables)
✅ Entire configuration files
✅ Command-line arguments
Once created, we can store ConfigMaps into Kubernetes, and it can insert ConfigMap into pods as:
🔹 Environment variables
🔹 Mounted files (as volumes)
🔹 Command-line arguments
Our case: Storing an Nginx Config in ConfigMap
Instead of modifying the Nginx image’s default.conf manually inside a pod (which would get lost after a restart), we create a ConfigMap at /home/admin/nginx-deployment/nginx-config.yaml:
apiVersion: v1kind: ConfigMapmetadata: name: nginx-config namespace: service-type-testdata: default.conf: | server { listen 80; location / { add_header X-Served-By $hostname; root /usr/share/nginx/html; index index.html; } }Here, default.conf is a key, and its value is the actual Nginx configuration file.
Let’s apply it into Kubernetes:
kubectl apply -f nginx-deployment/nginx-config.yamlkubectl get configmapsYou should see:
❯ kubectl get configmaps
NAME               DATA   AGEkube-root-ca.crt   1      5d13hnginx-config       1      101s
How Do We Use This ConfigMap in a Pod?
We need to mount the above ConfigMap inside our nginx-multiple-nodes deployment so that every pod automatically loads the config on startup. To do this, let’s just create a new nginx deployment yaml at/home/admin/nginx-deployment/nginx-multiple-nodes-with-custom.yaml:
apiVersion: apps/v1kind: Deploymentmetadata: name: nginx-multiple-nodes namespace: service-type-testspec: replicas: 3 selector: matchLabels: app: nginx template: metadata: labels: app: nginx spec: containers: - name: nginx image: nginx:latest ports: - containerPort: 80 volumeMounts: - name: nginx-config-volume mountPath: /etc/nginx/conf.d/default.conf # This is where we inject the file subPath: default.conf # subPath to tell K8S to only use the value of key 'default.conf' from the volume which is a configMap volumes: - name: nginx-config-volume configMap: name: nginx-configWhat’s Happening Here?
- Created a volume for using the configMap whose name is
nginx-configwhich has been applied in previous step. - Then mount the
nginx-configConfigMap as a file in/etc/nginx/conf.d/default.conf. - The original
default.confcomes with the Nginx image will be overwritten thus Nginx will start use this file instead of the original default one. - If we update the ConfigMap in Kubernetes in future, we can just restart the Nginx pod—no need to rebuild the container at all!
So now you see, because Kubernetes treats containers as immutable—any manual changes inside a running pod are lost when it restarts. ConfigMaps solve this by separating configuration from the application, making it:
✅ Easier to update (without modifying the container image)
✅ More flexible (different configs for different environments)
✅ More scalable (all pods pull the latest config automatically)
Let’s delete the existing Nginx deployment and apply the new one:
kubectl delete -f nginx-deployment/nginx-multiple-nodes.yamlkubectl apply -f nginx-deployment/nginx-multiple-nodes-with-custom.yamlkubectl get pods -o wide
Test Again!
Go back to my laptop:
for i in {1..10}; do curl -i -s http://172.16.211.200 | grep "X-Served-By"; donePlease note, I added -i to include response headers in the output.
Any Specialized Tools for Load Testing?
Okay, since you asked, let’s use hey (link here)!
Install it on my mac:
brew install heyIn order to get a clean start on logs, let’s restart our deployment:
kubectl rollout restart deployment nginx-multiple-nodes -n service-type-testThis is our new pods status:
❯ kubectl get pods -o wide
NAME                                    READY   STATUS    RESTARTS   AGE     IP            NODE    NOMINATED NODE   READINESS GATESnginx-multiple-nodes-668cdc96dd-4v8db   1/1     Running   0          2m46s   10.244.4.15   k8s-5   <none>           <none>nginx-multiple-nodes-668cdc96dd-cjz2r   1/1     Running   0          2m59s   10.244.1.11   k8s-2   <none>           <none>nginx-multiple-nodes-668cdc96dd-zlwqv   1/1     Running   0          2m34s   10.244.2.11   k8s-3   <none>           <none>testpod                                 1/1     Running   0          3d13h   10.244.2.5    k8s-3   <none>           <none>
Run:
hey -n 1000 -c 50 http://172.16.211.200It means:
- Send
1000HTTP requests tohttp://172.16.211.200. - Send
50requests concurrently.
This is our output:
❯ hey -n 1000 -c 50 http://172.16.211.200
Summary:  Total:        0.4999 secs  Slowest:      0.0759 secs  Fastest:      0.0135 secs  Average:      0.0242 secs  Requests/sec: 2000.3376
  Total data:   599010 bytes  Size/request: 615 bytes
Response time histogram:  0.013 [1]     |  0.020 [114]   |■■■■■■  0.026 [749]   |■■■■■■■■■■■■■■■■■■■■■■■■■■■■■■■■■■■■■■■■  0.032 [36]    |■■  0.038 [14]    |■  0.045 [10]    |■  0.051 [0]     |  0.057 [4]     |  0.063 [1]     |  0.070 [27]    |■  0.076 [18]    |■
Latency distribution:  10% in 0.0193 secs  25% in 0.0203 secs  50% in 0.0211 secs  75% in 0.0232 secs  90% in 0.0272 secs  95% in 0.0549 secs  99% in 0.0716 secs
Details (average, fastest, slowest):  DNS+dialup:   0.0004 secs, 0.0135 secs, 0.0759 secs  DNS-lookup:   0.0000 secs, 0.0000 secs, 0.0000 secs  req write:    0.0000 secs, 0.0000 secs, 0.0004 secs  resp wait:    0.0222 secs, 0.0133 secs, 0.0553 secs  resp read:    0.0003 secs, 0.0000 secs, 0.0047 secs
Status code distribution:  [200] 974 responses
Error distribution:  [1]   Get "http://172.16.211.200": read tcp 172.16.211.1:61257->172.16.211.200:80: read: connection reset by peer  [1]   Get "http://172.16.211.200": read tcp 172.16.211.1:61258->172.16.211.200:80: read: connection reset by peer  [1]   Get "http://172.16.211.200": read tcp 172.16.211.1:61260->172.16.211.200:80: read: connection reset by peer  [1]   Get "http://172.16.211.200": read tcp 172.16.211.1:61263->172.16.211.200:80: read: connection reset by peer  [1]   Get "http://172.16.211.200": read tcp 172.16.211.1:61264->172.16.211.200:80: read: connection reset by peer  [1]   Get "http://172.16.211.200": read tcp 172.16.211.1:61265->172.16.211.200:80: read: connection reset by peer  [1]   Get "http://172.16.211.200": read tcp 172.16.211.1:61266->172.16.211.200:80: read: connection reset by peer  [1]   Get "http://172.16.211.200": read tcp 172.16.211.1:61267->172.16.211.200:80: read: connection reset by peer  [1]   Get "http://172.16.211.200": read tcp 172.16.211.1:61268->172.16.211.200:80: read: connection reset by peer  [1]   Get "http://172.16.211.200": read tcp 172.16.211.1:61269->172.16.211.200:80: read: connection reset by peer  [1]   Get "http://172.16.211.200": read tcp 172.16.211.1:61270->172.16.211.200:80: read: connection reset by peer  [1]   Get "http://172.16.211.200": read tcp 172.16.211.1:61271->172.16.211.200:80: read: connection reset by peer  [1]   Get "http://172.16.211.200": read tcp 172.16.211.1:61272->172.16.211.200:80: read: connection reset by peer  [1]   Get "http://172.16.211.200": read tcp 172.16.211.1:61273->172.16.211.200:80: read: connection reset by peer  [1]   Get "http://172.16.211.200": read tcp 172.16.211.1:61274->172.16.211.200:80: read: connection reset by peer  [1]   Get "http://172.16.211.200": read tcp 172.16.211.1:61275->172.16.211.200:80: read: connection reset by peer  [1]   Get "http://172.16.211.200": read tcp 172.16.211.1:61276->172.16.211.200:80: read: connection reset by peer  [1]   Get "http://172.16.211.200": read tcp 172.16.211.1:61277->172.16.211.200:80: read: connection reset by peer  [1]   Get "http://172.16.211.200": read tcp 172.16.211.1:61278->172.16.211.200:80: read: connection reset by peer  [1]   Get "http://172.16.211.200": read tcp 172.16.211.1:61279->172.16.211.200:80: read: connection reset by peer  [1]   Get "http://172.16.211.200": read tcp 172.16.211.1:61280->172.16.211.200:80: read: connection reset by peer  [1]   Get "http://172.16.211.200": read tcp 172.16.211.1:61281->172.16.211.200:80: read: connection reset by peer  [1]   Get "http://172.16.211.200": read tcp 172.16.211.1:61282->172.16.211.200:80: read: connection reset by peer  [1]   Get "http://172.16.211.200": read tcp 172.16.211.1:61283->172.16.211.200:80: read: connection reset by peer  [1]   Get "http://172.16.211.200": read tcp 172.16.211.1:61284->172.16.211.200:80: read: connection reset by peer  [1]   Get "http://172.16.211.200": read tcp 172.16.211.1:61286->172.16.211.200:80: read: connection reset by peer
Do we really trust the data from hey?
Now worries, since we have a clean start, we can check Kubernetes Nginx pods logs telling request came from what client!
❯ kubectl logs -l app=nginx -n service-type-test --tail=1000 | awk '{print $1}' | grep -E '^[0-9]+\.[0-9]+\.[0-9]+\.[0-9]+$' | sort | uniq -c
    334 10.244.1.1    235 10.244.2.1    405 10.244.4.1
Add up 334 + 235 + 405 , it’s 974 match to hey output [200] 974 response !!!
I feel so satisifying!
Wait! You might have noticed, the IP in kubectl logs are not the IPs in kubectl get pods, that’s not our maplap IP… how can we use the data to say “it match” ??
Good observation!
The .1 address in each subnet (e.g., 10.244.1.1 and 10.244.2.1) is assigned to cni0, the bridge interface created by CNI (Flannel in our case). When traffic arrives at a pod, if it comes from another node, it first passes through Flannel’s virtual network (cni0). By default, Nginx logs the IP of the last network hop—which in this case is the Flannel bridge (cni0) instead of the original client.
Comparison between ClusterIP, NodePort, ExternalName and LoadBalancer
I know, a comparison table would be alwasy helpful at the end of post!
Here you go:
| Service Type | Use Case | How It Works | When to Use |
|---|---|---|---|
| ClusterIP (Default) | Internal communication within the cluster | Creates a stable internal IP that other pods can use | Use when exposing a service only to other pods (e.g., backend services, databases) |
| NodePort | Expose services externally via a node’s IP and a high-numbered port | Maps a fixed port (30000-32767) on each node to the service | Use when external access is needed without a LoadBalancer, mainly for development & testing |
| LoadBalancer | Expose services externally with a dedicated external IP | Allocates an external IP via cloud provider or MetalLB | Use when running on a cloud provider or using MetalLB in bare-metal environments |
| ExternalName | Map a service name to an external DNS name | DNS lookup redirects traffic to an external domain | Use when integrating Kubernetes services with external systems (e.g., external databases or APIs) |
🎉 Congratulations!
And that’s a wrap for our Part 5: ExternalName and LoadBalancer! 🎉 This one was a deep dive, but seeing everything come together feels amazing. We’ve tackled how Kubernetes handles external services and dynamic traffic distribution—powerful stuff! But we’re not stopping here.
Stay tuned for the next post! 😎🔥