GeekCoding101

To add password authentication to a Node.js app, hash each password with bcrypt when the user registers and store only the hash. On login, use bcrypt.compare to check the submitted password against that hash. In this guide we build exactly that with Express and TypeScript in a single app.ts file. Then we take a bcrypt hash apart so you can see where the salt is hidden.
This post is part of the Auth101 series on authentication. It is pitched easy-to-medium, and every step runs on your own machine.
What you’ll build
| Route | What it does |
|---|---|
POST /register | Takes a username and password, hashes the password with bcrypt, stores the user |
POST /login | Finds the user and checks the password with bcrypt.compare |
Users are kept in an in-memory array to keep the focus on hashing. In a real app you would use a database.
Why password authentication needs hashing
Password-based authentication is still one of the most common ways to verify who a user is: they send a username and password, and the server decides whether to let them in. The weak spot is storage. If you keep plain passwords and your database leaks, every account is exposed. The same goes for any other site where those users reuse the password.
So the server should never store the password itself. It stores a salted hash:
- Hash: a one-way transformation. You can check a password against it, but you can’t turn it back into the password.
- Salt: random data mixed in before hashing. The same password hashed twice gives two different results, which defeats precomputed “rainbow table” attacks.
- bcrypt: a password-hashing algorithm that is deliberately slow. Its slowness is tunable through a cost factor, and it stores the salt inside the hash for you.
Step 1: Set up Node.js and TypeScript
Here is what I ran on a Mac:
brew install node httpiemkdir password-auth && cd password-authnpm init -ynpm install express bcryptjsnpm install --save-dev typescript ts-node @types/node @types/express @types/bcryptjsSetting up an environment can be a bit daunting, so I don’t want to leave you hanging. Let’s walk through these commands:
brewis the Homebrew package manager for macOS and Linux. Installingnodegives you both Node.js and npm, the JavaScript package manager. httpie is a command-line HTTP client. We’ll use itshttpcommand to test the server.mkdir/cdcreate and enter the project folderpassword-auth.npm init -ycreates apackage.jsonstraight away. The-yaccepts the defaults, so you skip the questions.expressis a web framework for building web apps and APIs in Node.js. Writing a backend from scratch is slow and tedious, and Express handles routing, request parsing and responses for you.bcryptjsis a pure-JavaScript implementation of bcrypt. It needs no native build step, which makes it easy to install anywhere.typescriptandts-nodelet you run TypeScript directly. ts-node is a TypeScript execution engine for Node.js. It compiles your code to JavaScript in memory, without writing.jsfiles to disk. Installing it in the project (instead of globally with-g) keeps the version pinned inpackage.json. You run it withnpx, the npm package runner that ships with npm.@types/...packages provide type definitions for libraries that don’t ship their own. Without@types/express, TypeScript stops with an error likeCould not find a declaration file for module 'express'. If a package already includes its own TypeScript definitions, you don’t need the matching@typespackage.
 8. Dependencies vs devDependencies: a plain
npm install saves the package under dependencies. These are packages the app can’t run without, like express and bcryptjs. --save-dev (or -D) saves under devDependencies. These are tools you only need while developing or building, like typescript, ts-node and the @types packages. (Older tutorials use --save; it has been the default for years.)
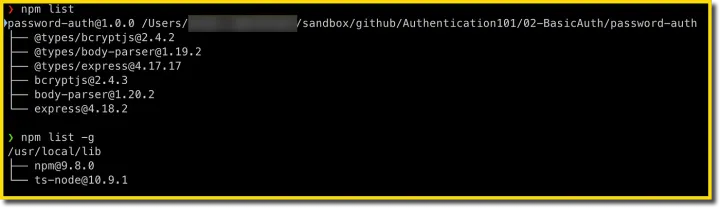
Run npm list to confirm everything is installed.
Note: The original version of this post used the
body-parserpackage. Express has a built-inexpress.json()parser that does the same job for JSON bodies, so you can drop that dependency.
Step 2: Create the server
Create app.ts:
import express, { Request, Response } from 'express';import bcrypt from 'bcryptjs';
const app = express();const PORT = 3000;const SALT_ROUNDS = 10;
app.use(express.json());
interface User {  id: number;  username: string;  password: string; // the bcrypt hash, never the plain password}
const users: User[] = [];
app.post('/register', async (req: Request, res: Response) => {  try {    const { username, password } = req.body ?? {};    if (typeof username !== 'string' || typeof password !== 'string' || !username || !password) {      res.status(400).json({ error: 'username and password are required' });      return;    }    if (users.some((u) => u.username === username)) {      res.status(409).json({ error: 'Username already taken' });      return;    }
    const salt = await bcrypt.genSalt(SALT_ROUNDS);    const hashedPassword = await bcrypt.hash(password, salt);
    users.push({ id: users.length + 1, username, password: hashedPassword });    res.status(201).json({ message: 'User registered successfully!' });  } catch (error) {    res.status(500).json({ error: 'Internal server error' });  }});
app.post('/login', async (req: Request, res: Response) => {  try {    const { username, password } = req.body ?? {};    if (typeof username !== 'string' || typeof password !== 'string') {      res.status(400).json({ error: 'username and password are required' });      return;    }
    const user = users.find((u) => u.username === username);    const isPasswordValid = user ? await bcrypt.compare(password, user.password) : false;
    if (!user || !isPasswordValid) {      res.status(401).json({ error: 'Invalid username or password' });      return;    }
    res.json({ message: 'Login successful!' });  } catch (error) {    res.status(500).json({ error: 'Internal server error' });  }});
app.listen(PORT, () => {  console.log(`Server is running on http://localhost:${PORT}`);});
The handlers call res.status(...).json(...) and then return; instead of return res.status(...). Recent Express type definitions expect a handler to return nothing, and returning the response object can trigger a “No overload matches this call” error.
Step 3: How the code works
/register
When a client sends a POST with a username and password, the server:
- Checks that both fields are present, and that the username isn’t already taken.
- Generates a salt with
bcrypt.genSalt(10). The10is the cost factor, explained below. - Hashes the password with that salt.
- Stores the user with the hash in the
passwordfield.
/login
The server looks up the user by username and calls bcrypt.compare(password, user.password). That returns true only if the submitted password produces the same hash.
Unknown usernames and wrong passwords both get the same 401 Invalid username or password. Telling them apart (“User not found” vs “Invalid password”) would let anyone probe which usernames exist on your system.
Why can bcrypt.compare work without the salt?
You might have noticed that we never store the salt separately, yet compare still works. The reason is that the salt is stored inside the hash. The bcrypt output contains the algorithm version, the cost factor, the salt and the hash itself, all in one string.
For example, hashing the plain password testpassword produced:
$2a$10$34rHf5RmJx1TZmZ7FM5BYe0BPXuw1bs6rYzzqyM7IXgN/VGcQmVMuThe string has three parts, separated by $ symbols:
| Part | Value | Meaning |
|---|---|---|
| Version | 2a | The bcrypt algorithm version. bcrypt was designed by the OpenBSD project to hash passwords for the OpenBSD password file. Hashes carry a prefix that names the algorithm, and bcrypt’s is $2$, with variants $2a$, $2b$, $2x$ and $2y$. |
| Cost | 10 | The cost factor (salt rounds) used to create the salt. 15 rounds would show $15$. |
| Salt | 34rHf5RmJx1TZmZ7FM5BYe | The first 22 characters after the cost: the salt. |
| Hash | 0BPXuw1bs6rYzzqyM7IXgN/VGcQmVMu | The remaining 31 characters: the hashed password. |
In short, the format is:
$2<a/b/x/y>$[cost]$[22-character salt][31-character hash]When you call compare, bcrypt reads the version, cost and salt out of the stored string. It hashes the submitted password with those exact settings and checks whether the result matches the last 31 characters. Because every user gets a random salt, two users with the same password still end up with different hashes. That is what protects you from rainbow table attacks.
What does the cost factor do?
The cost is a power of two: each +1 doubles the work needed to compute a hash. That cost hits you on every login, but it hits an attacker on every single guess. 10 is a common starting point. Raise it as high as your login latency allows on your own hardware.
Step 4: Test the server
Start the server from inside the password-auth folder:
npx ts-node ./app.ts
Then open another terminal and register a user with httpie:
echo '{"username": "testuser", "password": "testpassword"}' | http POST http://localhost:3000/register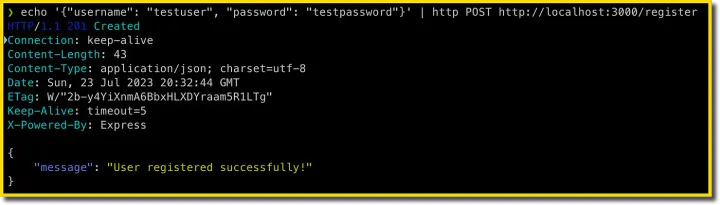
This creates the user testuser with the password testpassword. Now log in:
echo '{"username": "testuser", "password": "testpassword"}' | http POST http://localhost:3000/login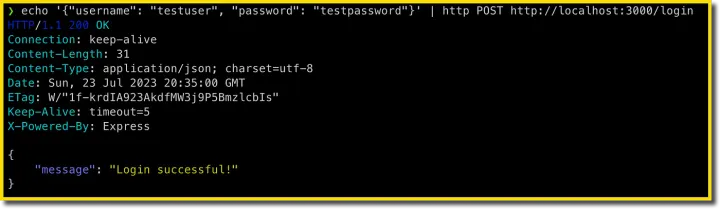
httpie also has a shorter syntax that sends JSON by default:
http POST :3000/login username=testuser password=testpasswordTry a wrong password and an unknown username too.
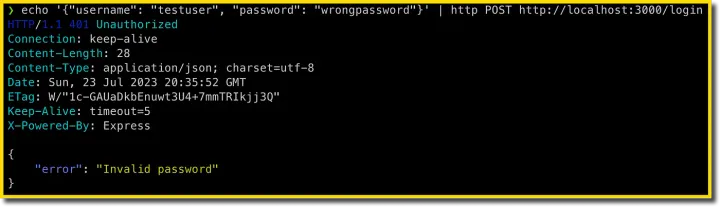
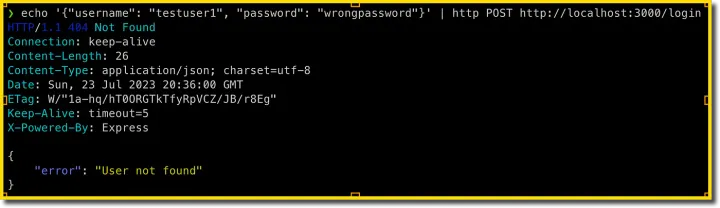
Here is what each request should return, based on the code above:
| Request | Status | Body |
|---|---|---|
| Register a new user | 201 | {"message": "User registered successfully!"} |
| Register the same username again | 409 | {"error": "Username already taken"} |
| Register or log in without a username or password | 400 | {"error": "username and password are required"} |
| Log in with correct credentials | 200 | {"message": "Login successful!"} |
| Log in with a wrong password or unknown user | 401 | {"error": "Invalid username or password"} |
✎ Make sure each request sends JSON to the right endpoint (/register or /login).
Users live in memory, so restarting the server wipes them. Register again after each restart.
Before you use this in production
This tutorial covers the hashing core. A real login system also needs:
- A database instead of the in-memory array, with a unique constraint on the username.
- HTTPS, so passwords aren’t sent in clear text.
- Rate limiting or lockouts on
/loginto slow down password guessing. - Consistent timing. In this demo, a login for an unknown user skips
bcrypt.compareand returns faster. Real systems often compare against a dummy hash so both cases take about the same time. - Password length rules. bcrypt only uses the first 72 bytes of input, so set a sensible maximum length, and a minimum length too.
- A session or token after login. “Login successful!” doesn’t keep the user logged in. You still need a session cookie or a token such as a JWT.
Summary
We built password-based authentication in Node.js and TypeScript with bcrypt:
- set up a Node.js and TypeScript project on macOS,
- wrote an Express server with
/registerand/loginroutes, - hashed passwords with bcrypt and compared them on login,
- and saw why
bcrypt.compareneeds no separate salt: the salt is part of the stored hash.
The source code for this tutorial is in the GeekCoding101 GitHub repo, so feel free to take a look.
Next in the Auth101 series, we build on this foundation with more authentication methods: HTTP Basic Authentication, two-factor authentication (2FA), and token-based authentication with JSON Web Tokens (JWT). Stay tuned 🎉
FAQ
Why doesn’t bcrypt need the salt stored separately?
The salt is embedded in the hash string: it’s the 22 characters after $2a$10$. bcrypt.compare reads it from the stored hash and reuses it.
What’s the difference between bcrypt and bcryptjs?
bcrypt is a native binding that has to compile on install. bcryptjs is pure JavaScript, so it is slower but installs anywhere. Both produce standard bcrypt hashes.
How many salt rounds should I use?
10 is a common starting point. Each extra round doubles the hashing time, so pick the highest cost your login latency can tolerate on your production hardware.
Is bcrypt still a good choice for password hashing? Yes, it’s a widely used, accepted option. OWASP’s Password Storage Cheat Sheet lists Argon2id as its first choice, and that is worth a look for new projects.
Why not just encrypt passwords? Encryption can be reversed by anyone with the key. A password hash is one-way, so the server can check a password without ever being able to read it back.