GeekCoding101

By GeekCoding101 · Auth101 series · Published Jan 15, 2024 · Updated [date]
A JSON Web Token (JWT) is a compact, signed string with three Base64Url-encoded parts (header, payload and signature) that a server issues after login and the client sends back on every request. In this post we break down the JWT structure, its claims and its signing algorithms. Then I build JWT authentication with access and refresh tokens from scratch in Node.js, Express and TypeScript, with no JWT library.
This is part of the Auth101 series. It builds on the password authentication and HTTP Basic Authentication posts, so the server code will look familiar if you’ve followed along.
On this page
- How a JWT is structured
- JWT claims: registered, public and private
- Signing algorithms: HS256, RS256, ES256
- Step 1: Set up Node.js and TypeScript
- Step 2: Create the server (
usersData.ts,jwt.ts,jwtAuthMiddleware.ts,app.ts) - Step 3: Test the server
- Debug a JWT with jwt.io
- Summary
- FAQ
How a JWT is structured
JWTs are defined in RFC 7519. They were designed as a compact, self-contained way to pass information between parties as a JSON object. That simplicity is why they became a widely adopted standard in web security.
A JWT is three parts joined by dots:
xxxxx.yyyyy.zzzzzheader.payload.signature| Part | What it holds | Encoding |
|---|---|---|
| Header | Token type and signing algorithm | Base64Url JSON |
| Payload | Claims about the user plus metadata | Base64Url JSON |
| Signature | Proof the header and payload weren’t changed | Base64Url bytes |
Important: the header and payload are encoded, not encrypted. Anyone holding the token can decode and read them. Never put passwords or secrets in a JWT payload.
Header
The header usually holds the token type and the signing algorithm:
{ "alg": "HS256", "typ": "JWT" }Payload
The payload contains claims, which are statements about an entity (usually the user) plus extra metadata. Each claim is a name/value pair. The name is always a string, and the value can be any JSON value. This payload has three claims (sub, name, admin):
{ "sub": "1234567890", "name": "Tom Green", "admin": false }Signature
The signature is created by signing the encoded header and payload with a key, using the algorithm named in the header. When the server verifies it, two things are confirmed:
- The token was issued by someone holding the key.
- The header and payload haven’t been changed along the way.
Example
A JWT for user john.doe signed with HMAC SHA256 contains:
- Header:
{ "alg": "HS256", "typ": "JWT" } - Payload:
{ "sub": "john.doe", "name": "John Doe", "admin": false, "iat": 1615070800 } - Signature: an HMAC SHA256 of
encodedHeader.encodedPayloadusing the secret key. We’ll implement this below.
JWT claims: registered, public and private
Claims come in three categories. Registered claims are standard. The latter two, public and private, are for your own custom data.
1. Registered claims
These are predefined names with specific meanings, recommended for interoperability:
| Claim | Name | Meaning |
|---|---|---|
iss | Issuer | Who issued the JWT |
sub | Subject | Who the JWT is about |
aud | Audience | Who the JWT is intended for |
exp | Expiration Time | On or after this time, the JWT must not be accepted |
nbf | Not Before | Before this time, the JWT must not be accepted |
iat | Issued At | When the JWT was issued |
jti | JWT ID | Unique ID; can be used to stop a token being replayed |
The full list is in the IANA JSON Web Token Claims Registry.
2. Public claims
You can define these at will. To avoid collisions, register them in the IANA JSON Web Token Claims Registry or use a collision-resistant name such as a URI.
3. Private claims
These are custom claims agreed between the parties that use them. They aren’t registered, so they can collide with other names.
When you create custom claims specific to your application, namespacing them keeps them unique:
{ "https://yourdomain.com/claims/user_type": "admin", "https://yourdomain.com/claims/access_level": "5"}Here the claims are prefixed with a URL you control (https://yourdomain.com/claims/). That URL acts as a namespace, so user_type and access_level won’t clash with standard claims or anyone else’s.
Signing algorithms: HS256, RS256, ES256
The alg header tells the verifier how the signature was made. These are the three you’ll meet most often:
alg | Method | Keys | Typical use |
|---|---|---|---|
| HS256 | HMAC with SHA-256 | One shared secret signs and verifies | A single service that issues and checks its own tokens |
| RS256 | RSA signature with SHA-256 | Private key signs, public key verifies | Many services need to verify, but only one should issue |
| ES256 | ECDSA (P-256) with SHA-256 | Private key signs, public key verifies | Same as RS256, with smaller keys and signatures |
The rule that matters most: your server should decide which algorithm it accepts. It should never trust whatever the token’s header says. Always reject "alg": "none".
This tutorial uses HS256 because one Express server both issues and verifies the tokens.
Implementing JWT authentication
Step 1: Set up Node.js and TypeScript
Follow Step 1 (“Setting Up the Node.js and TypeScript Environment”) in the earlier post Password Authentication in Node.js: A Step-by-Step Guide.
Step 2: Create the server
usersData.ts
This is the same usersData.ts from A Deep Dive Into HTTP Basic Authentication, with one new field, refreshToken:
interface User {  username: string;  password: string;  refreshToken?: string;}
const users: User[] = [];
export default users;
jwt.ts
I decided to generate and verify JWTs by hand, without libraries like jsonwebtoken, so you can see every step. The file provides these pieces:
base64UrlEncode/base64UrlDecode- Standard Base64 uses
+,/and=, which aren’t URL-safe. - Base64Url swaps
+for-and/for_, and drops the=padding.
- Standard Base64 uses
sign- Computes an HMAC SHA256 over
encodedHeader.encodedPayload. - Base64Url-encodes the raw signature bytes.
- Computes an HMAC SHA256 over
generateAccessToken- Builds a short-lived token (15 minutes) with the
HS256/JWTheader. - The payload holds
username,iatandexp.
- Builds a short-lived token (15 minutes) with the
generateRefreshToken- Same idea, but valid for 7 days, with
type: 'refresh'. - It’s used to get new access tokens without logging in again.
- Same idea, but valid for 7 days, with
verifyToken- Splits the token into its three parts and checks the algorithm.
- Recomputes the signature and compares it in constant time.
- Rejects expired tokens, then returns the decoded payload.
About secretKey: it’s the key that locks and unlocks your tokens. Anyone who gets it can mint valid tokens or forge changes to existing ones. Load it from an environment variable, use a long random value and never commit it to source control.
import crypto from 'crypto';
// Demo fallback only. Set JWT_SECRET to a long random value in real apps.const secretKey = process.env.JWT_SECRET || 'your_secret_key';
const base64UrlEncode = (buf: Buffer): string =>  buf.toString('base64')    .replace(/\+/g, '-')    .replace(/\//g, '_')    .replace(/=/g, '');
const base64UrlDecode = (str: string): Buffer =>  Buffer.from(str.replace(/-/g, '+').replace(/_/g, '/'), 'base64');
const sign = (header: string, payload: string, secret: string): string => {  const signature = crypto.createHmac('sha256', secret)    .update(`${header}.${payload}`)    .digest(); // raw bytes, not a base64 string  return base64UrlEncode(signature);};
const createToken = (payload: object): string => {  const header = { alg: 'HS256', typ: 'JWT' };  const encodedHeader = base64UrlEncode(Buffer.from(JSON.stringify(header)));  const encodedPayload = base64UrlEncode(Buffer.from(JSON.stringify(payload)));  const signature = sign(encodedHeader, encodedPayload, secretKey);  return `${encodedHeader}.${encodedPayload}.${signature}`;};
export const generateAccessToken = (username: string): string => {  const now = Math.floor(Date.now() / 1000);  return createToken({ username, iat: now, exp: now + 15 * 60 }); // 15 minutes};
export const generateRefreshToken = (username: string): string => {  const now = Math.floor(Date.now() / 1000);  return createToken({ username, type: 'refresh', iat: now, exp: now + 7 * 24 * 60 * 60 }); // 7 days};
export const verifyToken = (token: string): any => {  const parts = token.split('.');  if (parts.length !== 3) {    throw new Error('Malformed token');  }  const [encodedHeader, encodedPayload, signature] = parts;
  // Only accept the algorithm we issue. Never trust the header blindly.  const header = JSON.parse(base64UrlDecode(encodedHeader).toString());  if (header.alg !== 'HS256') {    throw new Error('Unexpected algorithm');  }
  // Constant-time comparison avoids leaking information through timing.  const expected = Buffer.from(sign(encodedHeader, encodedPayload, secretKey));  const received = Buffer.from(signature);  if (expected.length !== received.length || !crypto.timingSafeEqual(expected, received)) {    throw new Error('Invalid token');  }
  const payload = JSON.parse(base64UrlDecode(encodedPayload).toString());  if (typeof payload.exp !== 'number' || Math.floor(Date.now() / 1000) >= payload.exp) {    throw new Error('Token expired');  }
  return payload;};
jwtAuthMiddleware.ts
This middleware handles JWT authentication for incoming requests:
- It expects an
Authorization: Bearer <token>header and verifies the token. - It rejects refresh tokens, so they can’t be used as access tokens.
- It exposes the decoded user to the route handler.
import { Request, Response, NextFunction } from 'express';import { verifyToken } from './jwt';
export const jwtAuthMiddleware = (req: Request, res: Response, next: NextFunction) => {  try {    const authHeader = req.headers.authorization;    if (!authHeader || !authHeader.startsWith('Bearer ')) {      return res.status(401).json({ error: 'Authorization header missing' });    }
    const token = authHeader.slice('Bearer '.length);    const decodedUser = verifyToken(token);
    // A refresh token must not unlock protected routes    if (decodedUser.type === 'refresh') {      return res.status(401).json({ error: 'Invalid token' });    }
    // Create a closure to pass the decoded user    (req as any).getUser = () => decodedUser;
    next();  } catch (error) {    res.status(401).json({ error: 'Invalid token' });  }};
app.ts
Now let’s assemble everything in app.ts. It has routes for:
- user registration, deletion and listing
- login
- token refresh
- a protected route
The
/usersand/user/:usernameroutes are left open to keep the demo simple. In a real app, protect them withjwtAuthMiddlewareand an admin check.
import express, { Request, Response } from 'express';import bodyParser from 'body-parser';import bcrypt from 'bcrypt';import users from './usersData';import { generateAccessToken, generateRefreshToken, verifyToken } from './jwt';import { jwtAuthMiddleware } from './jwtAuthMiddleware';
const app = express();const PORT = 3001;
app.use(bodyParser.json());
// User registration routeapp.post('/register', async (req: Request, res: Response) => {  try {    const { username, password } = req.body;
    // Check if the user already exists    if (users.some((user) => user.username === username)) {      return res.status(400).json({ error: 'Username already exists' });    }
    // Hash the password using bcrypt    const salt = await bcrypt.genSalt(10);    const hashedPassword = await bcrypt.hash(password, salt);
    // Save the user    const newUser = { username, password: hashedPassword };    users.push(newUser);
    res.status(201).json({ message: 'User registered successfully!' });  } catch (error) {    res.status(500).json({ error: 'Internal server error' });  }});
app.delete('/user/:username', (req: Request, res: Response) => {  const { username } = req.params;  const userIndex = users.findIndex((user) => user.username === username);
  if (userIndex === -1) {    return res.status(404).json({ error: 'User not found' });  }
  users.splice(userIndex, 1);  res.status(200).json({ message: `User ${username} deleted successfully` });});
app.get('/users', (req: Request, res: Response) => {  // Strip password hashes and refresh tokens before returning users  const safeUsers = users.map(({ password, refreshToken, ...rest }) => rest);  res.json(safeUsers);});
// User login routeapp.post('/login', async (req: Request, res: Response) => {  try {    const { username, password } = req.body;    const user = users.find((user) => user.username === username);
    // Same message for both cases, so attackers can't probe which usernames exist    if (!user || !(await bcrypt.compare(password, user.password))) {      return res.status(401).json({ error: 'Invalid username or password' });    }
    const accessToken = generateAccessToken(username);    const refreshToken = generateRefreshToken(username);    user.refreshToken = refreshToken;
    res.json({ accessToken, refreshToken });  } catch (error) {    res.status(500).json({ error: 'Internal server error' });  }});
Step 3: Test the server
Debug a JWT with jwt.io
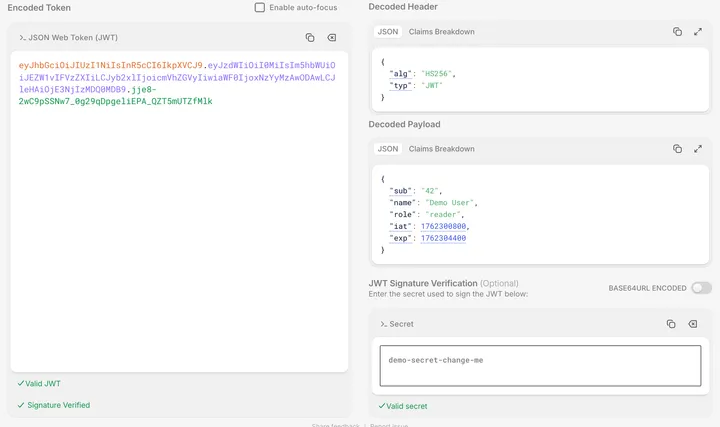
With the corrected sign function, you can paste a token from this server into jwt.io together with your secret key, and the signature should show as verified. Use test tokens only. Don’t paste production tokens or real secrets into an online debugger.
Summary
- A JWT is
header.payload.signature, each part Base64Url-encoded. The payload is readable by anyone, so keep secrets out of it. - Registered claims such as
exp,iatandsubhave standard meanings. Namespace your own custom claims with a URL you control. - HS256 uses one shared secret. RS256 and ES256 sign with a private key and verify with a public key.
- Our Node.js server issues a 15-minute access token and a 7-day refresh token. It verifies signatures in constant time, pins the algorithm and rejects expired tokens.
Building JWTs by hand is the best way to understand them. For production, use a well-maintained library, since one small slip in hand-written crypto code is enough to break your auth.
FAQ
Is the data in a JWT encrypted? No. A standard signed JWT is only Base64Url-encoded, so anyone with the token can read the header and payload. The signature stops tampering, not reading. If the contents must stay private, use encrypted JWTs (JWE) or keep the data on the server.
What’s the difference between HS256 and RS256? HS256 signs and verifies with the same shared secret, so every verifier could also mint tokens. RS256 signs with a private key and verifies with a public key. Many services can check tokens, but only the holder of the private key can issue them.
Why use both an access token and a refresh token? A short-lived access token limits the damage if it leaks. The long-lived refresh token lets the client get a new access token without asking the user to log in again. In this tutorial, the middleware refuses refresh tokens on protected routes.
Should I write my own JWT code in production?
Treat the from-scratch version here as a learning tool. In production, use a maintained JWT library and configure it to accept only the algorithm you expect, check exp, and validate iss and aud where you use them.